You want to create a website but don’t have enough funds; what do you do? Well, creating a website doesn’t have to cost an arm and a leg. You can create a website for free and command the web presence you have always desired.
If you haven’t thought about it yet, having a website establishes an online presence for your business, engages your audience, cultivates a relationship, and more. But how?
You can create a website for free using a free builder or upload your coded website on a free hosting service such as GitHub. In this article, I’ll guide you through creating a website for free using a free website builder.
By the end of this article, you will have a free live website, just like mine!
So, let’s get started.
7 Steps to Create a Website for Free
These steps will help you create a website for free that’s live and shareable with your friends, family, and co-workers.
1. Choose a Free Website Builder
To create a free website, you need free hosting. Hosting is a webspace where you store website files that include code, texts, images, files, etc.
Hosting is what makes building a custom website expensive. However, most website builders offer you a free package, which is what we’re taking advantage of here.
There are tens of free website builders, but a few stand out, and I’ll recommend them later in this article. But before I do, you need to choose a free website builder.
How to Choose a Free Website Builder
Designers consider various aspects when choosing a website builder. But in this section, I’ll guide you through the basic factors you need to choose a builder.
a. Your Needs and Priorities.
There are numerous free website builders, all made with different user needs in mind. Some website builders consider the level of experience you have in design, while others consider the types of media you will include on the website. In addition, different website builders have functionalities ideal for an online store.
As a designer, think clearly about what you’ll be using your website for. Your needs and priorities will define the best website builder for your free website. Here is a quick tip; you can seek inspiration from existing sites.
b. The Existing Themes and Templates
Website builders come with pre-existing themes and templates. These templates ease the development process. All you need to do is import a template and customize it. Choosing a website builder with many pre-existing themes makes finding a design you love easy.
c. Easy of Use
A website builder should be easy to use; that’s essentially why designers opt for them rather than coding. However, all aren’t easy to use, and I can undoubtedly say this, having used most in my designing experience.
Choose a website builder with drag-and-drop functionality, a large pool of elements, and more. You can sample some user reviews on ease of use through peer-to-peer networks such as Reddit to get more unbiased reviews.
d. SEO Friendly
What’s the benefit of having a website if people don’t see your handwork? You definitely want something that people can find, right? Choose a website builder that makes SEO practices right, easy, and effortless.
e. Company Reputation
Does the website builder have support, and how quickly do they handle issues? What’s its reputation on peer-to-peer review sites such as Reddit? Choose a builder that has constant support on simple and technical issues. You can never be sure when you need help!
These five tips are basic yet essential know-how when choosing a website builder. That said, which are the top three best free website builders and why?
Best Platforms to Create a Free Website
There are over ten free website builders that you can take advantage of. However, the top three best platforms to create a free website are:
a. WordPress.com
WordPress is the world’s most popular content management system that controls over 43% market share. WordPress builder offers creatives two options: WordPress.org and WordPress.com.
WordPress.org is an open-source software you can download and use to create and customize your website. To use WordPress.org, you need to purchase a domain and hosting. WordPress.org gives you more control to keep the website safe, healthy, and live.
On the contrary, WordPress.com is a beginner-friendly option that you can use to create a free website. WordPress.com has numerous templates you can edit using the classic editor or the Gutenberg block editor.
Benefits
- High library of themes and plugins.
- SEO and mobile-friendly features.
- Customizable and flexible
Disadvantages
- WordPress.com is limited compared to WordPress.org.
- The free version shows ads.
b. Wix
Wix is arguably one of the best free website builders that commands a user base of over 200 million. Most users love it because of its easy drag-and-drop editor and the large library of integration apps.
Moreover, Wix features artificial design intelligence (ADI) software that guides you on design. The AI proposes a design that befits your website when you answer a few questions.
Benefits
- Extensive library of apps and templates.
- Easy monitoring of analytics and reporting.
- SEO and mobile optimization.
Disadvantages
- The free version shows ads by default.
- Its plans are pricey.
c. Webflow
Not many builders have been designer-friendly for a long time, well, not until Webflow came into place. Webflow is best for designers who want more control over the design than the usual web development tools.
Webflow is easy to use, but designers used to other builders may find its tools a little complex. However, the platform has a wide library of resources to guide designers, including blog posts, forums, FAQs, etc.
Benefits
- Powerful drag-and-drop builder, often referred to as what-you-see-is-what-you-get.
- Mobile and responsive interface.
- Available third-party integrations and widgets
Disadvantages
- Requires some basic coding skills in HTML and CSS.
- Its pricing is complex and pricey.
There you go! Those are the best free website builders I’ve used so far. I’ll use the Wix free website builder for the free website we’re creating.
2. Create an Account
After choosing your free website builder, the next step is creating an account on the platform. In this guide, I’ll create a free website using Wix.
Sign up for a Wix account using Google, Facebook, or email. I prefer using the Google account to typing the email manually because I won’t have to verify my email. I’d recommend you do the same.

Once you sign up, you will be directed to the dashboard. Click on the ‘Create New Site” button to initiate the free website customization process.
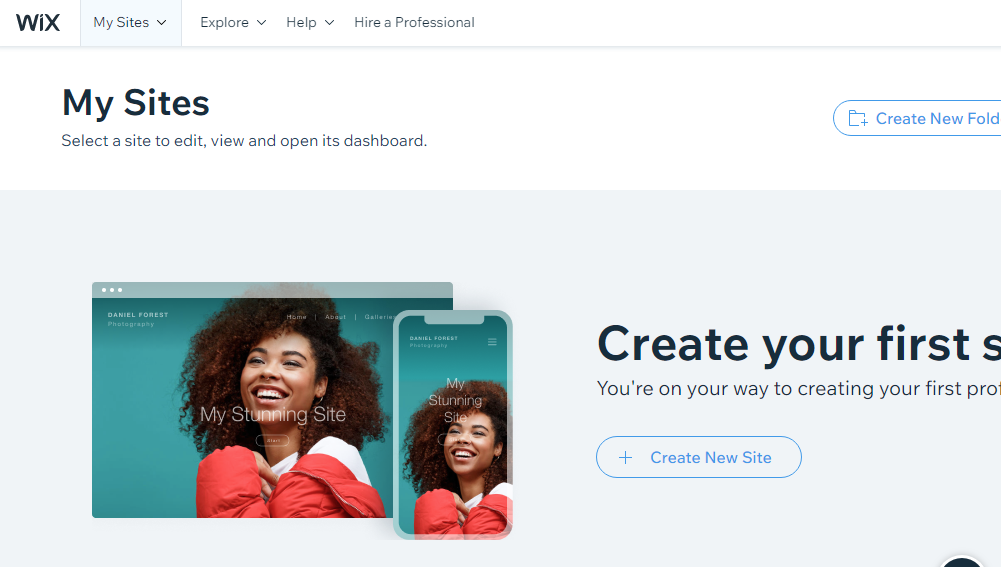
You will have to answer a few questions, like the website’s name and more. Once done, you will land on this dashboard. You have two options; use a ready-made template or have Wix AI customize a template for you. Let’s have Wix AI create a custom template.

The next phase will require you to enter website information such as logo, email, and address.

Select a font and an idealistic template for your website. The fundamental reason why we use templates is to reduce the redesigning work.
By now, you should be here:
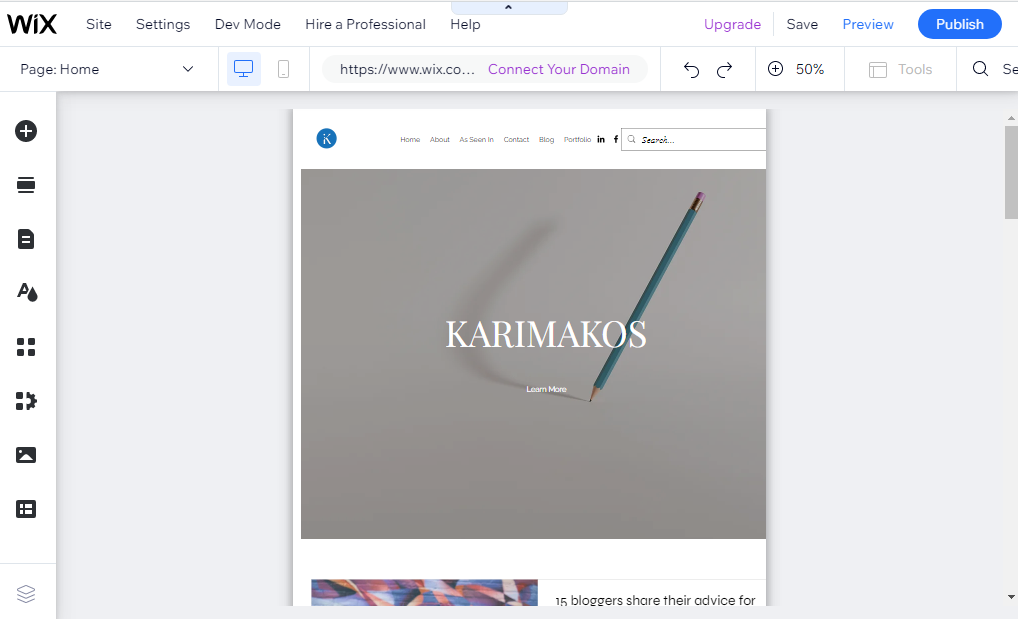
3. Choose a Domain Name
Before customizing your website, we need to connect it to a domain name. A domain name is an online address that guides your visitors to your website. It is the domain name you enter in your browser’s search bar.
For example, to land on my website directly, you enter my domain name on the search bar. Here is the domain name.

You cannot create a website for free without a domain name. Buying a custom domain name costs about $15 yearly. But, since we want to create our website entirely free, in the next step, I’ll guide you on how to add a domain name to our free website.
But before we add the domain name, how do you choose it even choose a domain?
How to choose a domain name
- Keep It Simple. Choose a domain name that is short and memorable. A domain name is meant to replace the numeric IP addresses. Therefore, ensure the domain name is relatable and unique to your target audience.
- Consider the Domain Extension. The best domain extension to go for is a .com. However, the free website will likely have a different format because it’s not paid. But in the future, should you go for a custom domain, make it an example.com domain.
- Add a Keyword to Your Domain. Using a keyword has always been helpful, depending on the niche you aim to focus on. For example, if your business focuses on cake recipes, cakerecipes.com would be a great keyword to use as a domain name.
- Use Your Business Name. If your business name is already incorporated, it would be wise to use it as the domain name. This will harness your existing audience as well as the existing brand credibility.
These are the major factors to consider when choosing a domain name. There are more factors, but I’ll cover them more extensively in a later article.
If you have an existing domain name or would love to connect a custom domain to the free website we created on Wix, click on connect domain. Then proceed to buy or connect with an existing account.
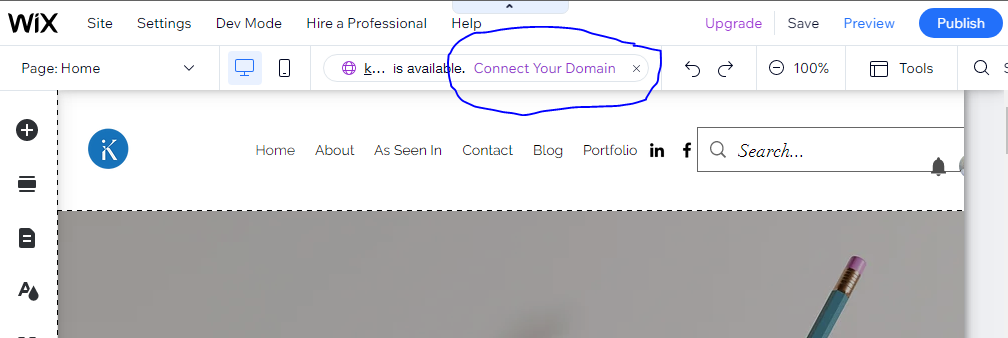
However, for those who want to create the website entirely free, click on publish (the top right corner). You will see a popup window with your domain name before going live. The existing format is email.wixsite.com/site.

Note that you can only edit the site name, in this case, Karimakos. To edit the site name, go to settings>website settings and customize the domain name.

That said, let’s start customizing the design of the website.
4. Customize the Design
Customizing the design is the most important step when creating a website. It is where you maximize UX/UI to determine how your website users interact with your design.
A great website should:
- Showcase your brand colors.
- Be easy to navigate.
- Have great copy and content.
- Be optimized for SEO.
- Readable and have perfect content font size.
- Be responsive to mobile, tablet, and desktop users.
- Be accessible to people with various disabilities.
All these aspects must reflect on your website. I’ll cover more about the best website design practices in the future, explaining each bullet point extensively.
Let’s segment the customizing process into two; the header, the body, and the footer. Once you customize the home page sections, you must duplicate the processes on all the pages. A basic website should have five pages, the homepage, services, about, contact, and blog.
- Homepage: This is the landing page of your website when customers search for yourdomain.com. The page offers customers most of the information about your business. The page also hyperlinks to other less visible pages.
- Services: This page lists the products or packages that your website visitors can purchase from you. It further lists the specific features of each service, offering more details on why customers should buy from you.
- About: Most website visitors love hearing about your why. The About page shares your story, brand mission, vision, and values. You can also list your company team on this page and much more.
- Contact: It is perhaps one of the most important pages on your website. Customers who want to reach out to you visit this page. It shares your contact details from email, phone numbers, social, and physical addresses.
- Blog: Often optional but crucial in modern times, it lists your blog posts. It is where you list your written or video content, newsletters, press releases, and more. This page is more important for businesses that want to create web content that harnesses organic SEO traffic.
Some websites may have more pages, and others few depending on the niche and the type of website. For example, ecommerce websites have many pages, whereas portfolio websites may have less or even a single page.
That said, let’s start customizing;
a. The Header
All you need to do is hover on the element you want to edit and click quick edit. Website builders are that simple to customize. On the other hand, you can access all the important components of your website design, like adding a component, a section, etc, on the left bar.
With just a few customizations, adding elements, and resizing, my website header is ready!

b. The Body and Footer
I’ll add a few sections and customize the already existing ones. You can add new elements using the left bar.

Additionally, you can click the item you want to customize and a few popup options. Customize the pages until you love them. Here is a sample homepage and footer that I customized.

Repeat the process on all the pages. Should it be hard to customize any feature and quickly search for the solution on the web? You can also email me or fill out the contact form.
Once that’s done, let’s make it responsive.
5. Make It Responsive and Add Functionalities
Making your website responsive is key to the success of your business or the overall design. Your visitors will be viewing your website from different screen size devices.
Making the website responsive ensures that it is adaptive to various screen sizes. Some customers will view the website on phones, tablets, and desktops.
A good website should have a consistent design. The colors, the items, etc. So, how do you do that?
You make a website responsive by setting breaking points, optimizing accessibility, and wrapping image and video sizes for various screen sizes. Lucky for you, this process is easy on the Wix website builder. Here is how to make your website responsive on Wix:Click on the mobile icon at the top bar of your builder:

Once in mobile mode, you can edit a few features to ensure the design remains similar. The common edits include the following:
- Elements out of place
- Enlarged font size
- The spacing of elements.
- Hiding some features.
Check all the pages in the mobile version. Unless you have a very complex design, optimizing shouldn’t take you more than 20 mins. Here are some of the edits I made.

6. Publish the Website
Well, it’s time to go live! It’s been a long journey, and now is the time to let the world see what you’re up to. But before you publish your website, save and preview it. If everything looks perfect, click the publish button; on the far right.

Just one step now that your website is live. Bring some traffic, and let people view the website.
7. Drive Traffic
Creating a website is just the tip of the iceberg; people need to see it. You need to bring traffic from customers, readers, and more. So how do you bring traffic to your website?
There are several ways to harness and drive traffic to your website:
You can create traffic by sharing your website on social channels. If you have created profiles on several social channels such as Facebook, Twitter, Instagram, Reddit, etc, you can redirect this audience to your website.
The second option is to start blogging. Blogging is creating informational written content and posting the content on your website. Blogging is one of the best options for harnessing organic traffic from search engines and driving it to your website. Blogging improves your visibility and sales conversion rates.
In addition, you need to optimize your website for search engines. Website optimization is a vast topic. However, some of the basic optimization tricks we can practice on our website include adding the meta title, meta descriptions, and more.
There are more optimization hacks, but I’ll focus on adding meta titles and descriptions for each page in this article. So how do we add these titles and descriptions to our newly created website?
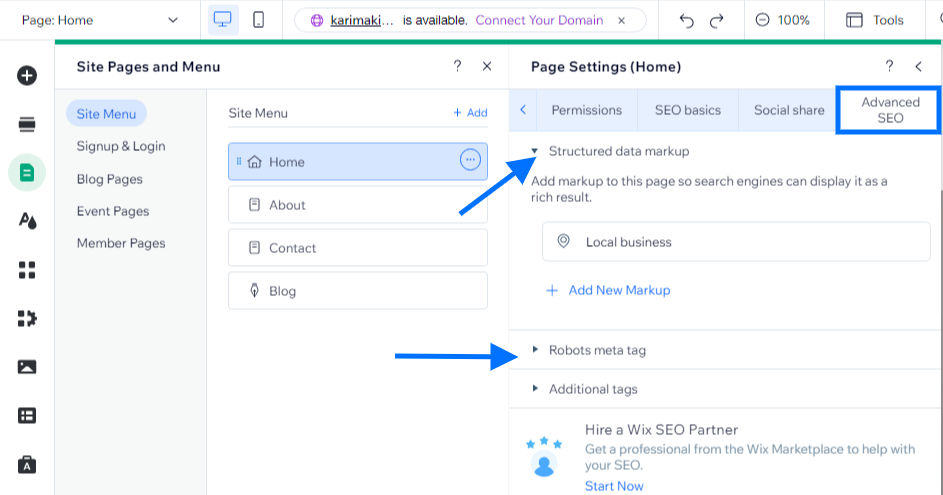
To access the SEO setting of your pages:
Go to Site pages and menu>Site Menu Click to select the page you want to optimize. The right side of the page has three buttons, and a few options will pop up.

Click on the SEO Basics option to redirect you to a similar page.

Add a meta description for every page. A meta description should be salesy and have at most 160 characters.
You can also customize more by clicking Advanced SEO and customizing the features. There are more attributes in the Advanced SEO tab, such as excluding pages from indexing, adding canonical tags, and more.
And there you go!! You have successfully created your free website. You can view My free Wix website to get inspiration and see the final product.
Conclusion
It is easy to create a website for free, using over ten builders available in the market today. You just need to sign up, customize the website and publish it within minutes. There are over 15 free website builders to choose from, depending on your preference.
I’d be so fascinated to hear about the website you created. Share your live website link in the comment section. In addition, if you have a question or feedback about how to create a website for free, email me or call me today!
